Saturday, November 19, 2011

Cutting Board Craft and Brunch Birthday Party!

I can't seem to do normal things for my birthday party. I always like to make it into a food competition or have a food theme of some kind. This year for my birthday, I went for something slightly different... Lately I've been seeing all these beautiful, rustic wooden cutting boards everywhere. They look so lovely for displaying cheese and fruits, or in food photography. So I decided I wanted to try and make my own wooden cutting board... and since I was going to research it, why not turn it into a craft party or sorts, so others can enjoy the process and make something for themselves too?? Fun, right!? The only not-so-cool part about hosting a brunch on my birthday was spending quite a bit of time and effort in preparing all the food. Next time I will only invite four people over, instead of twenty...! Aiyahh!


For brunch, I made spelt flour Belgian waffles, buckwheat pancakes, a breakfast potato casserole with aged cheddar and sour cream, oven-roasted hashbrown potatoes, pumpkin muffins with a cinnamon sugar topping and milk chocolate chunk cookies (my current favourite). We had a cheese board with rye bread and olive-oil baguette crostini, orange juice and fresh berries, yogurt and maple syrup for waffle toppings.


I found a lovely piece of teak at the local wood store, along with a weird off-cut piece of Madagascar ebony in the "exotic woods" section. I invited guests to bring a piece of wood to sand and oil into a lovely cutting board! Rich sanded down the ebony into the smoothest jumbo wonky piano key - it looks so shiny and black, perfect for a sushi display or a weird ice cream photo shoot! My teak wood piece turned out so nice, I really love it! My favourite cutting board was my friend Shira and Scott's, a great piece of character wood with a few silvery paint splotches on it, sanded down and oiled. They faux-aged some painted handles they found at the hardware store and attached them to the sides - perfect, super-cool looking cutting board!

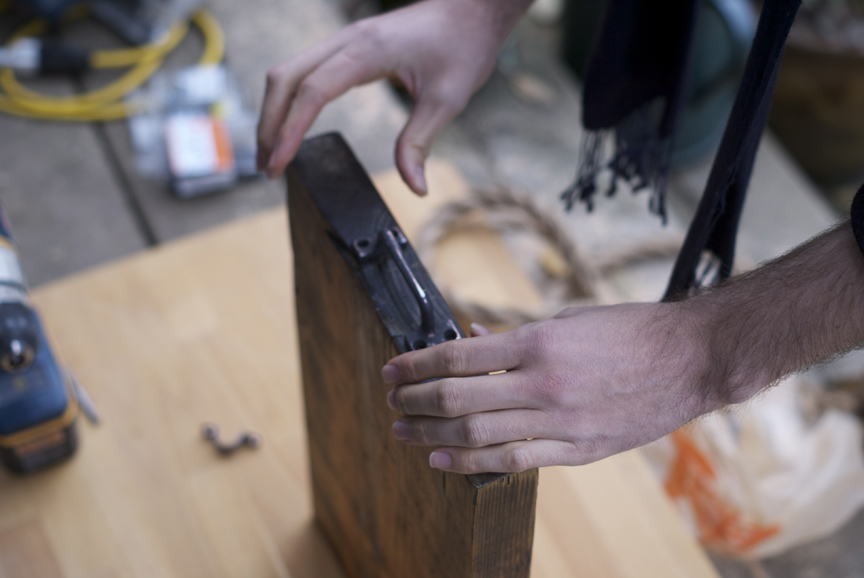
Some people ate waffles and chit-chatted the afternoon away, others sliced and sanded wood, sanding down to super smooth finishes, and rubbing butcher block oil in to soak up, brighten and enliven.Cutting boards and cutting-board makers!

My teak cheese board!

And my fave cutting board of the day: Shira and Scott's awesome cutting board, aged, sanded and oiled to perfection! Man, that's going to look good with a loaf of bread and some cheese on it! Nice work, buddies!

Til next time, trompe chomp interweb world!

xo Lyndsay

Thursday, November 10, 2011

IT'S PIE O'CLOCK


Loco dingo pie-o'clock-o.

I did go a little bonkers in pie-making this past Sunday but it was all done with love in my heart and relaxation station on my brain. Seriously, I know many people might think that spending the day making 3 different crusts and coring and slicing apples and sautéing sweet onions, leeks and carrots and rolling out dough and chilling dough and poking little fork holes in bottoms of pie crusts, slicing figs, running many a vegetable along my trusty mandolin slicer... etc... might be a drag and a half. But for me, it was a pleasant day of non-cakes where I could have fun trying to develop a new skill in the kitchen, trying out some yummy-sounding recipes and monkeying around in Pie Land.


Veggie pot pie filling, pre-gravy


Pies cooling!


Table set for dinner. New Fog Linen tablecloth and placemats! Love!


Getting ready to slice on in.


Sliced in! Caramelized onion, goat cheese and fig tart with balsamic reduction.
So easy and so yummy!

Cutting in to Mr.Veggie Pot Pie.


Not so great lighting. Oh well!

A fun and casual-times evening with pies and pals!
---------------------------------------------------------------------------------------------------------

AND NOW... A FEW TIPS FOR PIE MAKING!

1. When making the precious pie dough, I find it's best when the ingredients barely come together and still appear crumbly. There are few ingredients that make up a pie dough but if those ingredients interact poorly, they can really affect the consistency of the crust! Barely touch the dough with your hands and watch your ice water. Less is more, only add a little at a time until it barely comes together.

2. Really do all those crazy things recipes call for when making pie dough, ie chilling it for the right amount of time, and chilling the pie in the freezer before it goes into the oven. It's amazing what a little stone-cold-chillin' does for a pie.

3. Don't be scared to try a pie! Like anything, pies get better with practice! I have made some seriously sucky pies and some pretty darn good ones! No biggie! No sweat!


AND HERE ARE THE LINKS TO THE PIE RECIPES!

Classic pate brisee pie dough for the apple pie. (except I add a heaping tablespoon of sugar to my dough instead of the little teaspoon because I prefer the dough to taste a little bit sweet)

Veggie pot pie with cashew mushroom gravy. You can really use any vegetables in this. The kicker is the delicious grated parmesan garlic butter crust.

Use the pate brisee recipe for this but omit the sugar. So simple and so delicious goat cheese onion tart with figs and balsamic!

Apple pie! I ditched the nutmeg and cloves.

And my recipe for maple pumpkin pie, found on Poppytalk!

Happy pie making! xo Lyndsay

Thursday, October 27, 2011

MUSHROOM BEAUTY


Mushroom picking is alive and well in the Pacific Northwest where I live, and every year for the past few years I've wanted to go mushroom picking for the matsutake pine mushroom - a beautiful mushroom grown where you would find pine trees, prized for its distinct, strong aroma. My friend Cindy has been going mushroom picking with her family since she was a child, and her dad is the secret mushroom man with decades of mushroom picking under his belt. So with a little secret knowledge punched into an iPhone, our little mushroom picking crew set off towards the mountains on a crisp Fall morning in October. While we sadly didn't find our special mushroom this time, we had a blast exploring the forest and its many mushroom varieties... and enjoyed a mushroom-themed hotpot for dinner!

Cindy's dad explaining where he used to go to pick mushrooms.

Our trip mascot, the adorable and hilarious baby Saya!

Into the woods we went. How beautiful our province is...

Mushrooms galore! These were golden in colour with a slick slime accumulated on its pretty ruffly top. All I could think of was the story of Babar the elephant, and how his parents died of eating poisonous mushrooms...

Upside down mushroom reminded me of a round pancake slug clinging to a branch.


False matsutake! We thought we found one.
Sadly, our area seemed to be picked over for the pine mushroom!


Lovely looking brown-capped mushrooms, but again we couldn't identify it so didn't want to end up a like a green-skinned poisoned elephant.

This was a disturbing/hilarious little find - a greyish... okay, "dink" mushroom!


THESE WERE CRAZY! They looked like they were a movie prop, light pink mushrooms with oozing red blood-like jelly. I looked this up when we got home and it's called the Bleeding Tooth Fungus. Interestingly enough, this mushroom isn't even toxic - scientists have even discovered this horrifying little shroom holds some antiobiotic properties.


A little bridge in the forest.

Sadly, no pine mushrooms for us on this trip! I must've seen over 20 varieties of other mushrooms. I think I'm mushroom crazy now. However, back at the cabin...

The reading of the dog book - Cindy looks up dogs, her partner Marc chops wood!

A nice roaring fire, with wood on deck...


...and dinner prep begins! Cindy is the master hot pot chef, which is a giant boiling pot of tangy broth housing a myriad of delicious ingredients. Items continue to be added to the broth, cooked in the broth and served right out of the soup.

We may not have picked our pine mushroom, but we brought plenty of our own - enoki mushroom strands and shiitake mushrooms...

Shredded shards of seasoned seaweed.
I like to eat this by itself, so thin, delicately crunchy and yummy!

Must have greens.

And finely grated-to-a-pulp daikon (Japanese radish), to be mixed with homemade ponzu sauce for the bottom of each soup bowl.

The broth bubbling along...

The broth cooking up the mushrooms, greens, udon noodles and tofu!

Baked sweet kambocha squash, to be used for gyoza filling.

Pan fried, handmade kabocha squash gyoza!

Super soup - hot pot party!

I'll have a side of gyoza, please! A beautiful end to a beautiful day with good friends.
Til next time, mushroom lovers! xo

Come on down to Brownie Town

I started blogging on the lovely design blog POPPYTALK! Here is one of my recent posts - BROWNIES! Dark chocolate spelt brownies made with olive oil and walnuts, to be exact...


So I've been trying to eat a bit healthier of late ... it could have to do with my turning 35 really soon (aiyahhhh!) and wanting to cleanse the body somewhat... My attempt at healthy eating also includes trying to develop some baked treats that raise the health bar a little higher than my usual decadent standbys of butter, eggs and cream!

I've been straddling a bit of a vegan vibe lately too, influenced by some recent readings and books. Thus, my attempt here at a dairy-free brownie-type specimen that would hopefully fill my cravings without relying on the usual suspects of white flour, white sugar and dairy!


It took every ounce of my being not to add pieces of lush Lindt dark chocolate to the mix, instead I added walnuts (high in Omega 3's!). For the sweetener, I used brown rice syrup, which is a thick, liquid sweetener that won't send you into a sugar high and low like regular white sugar can. If you can't find brown rice syrup, you can substitute 1 1/4 cups of granulated sugar, no problemo!

Coconut milk is a rich alternative to conventional dairy, and heck coconut oil and coconut milk have been getting some good press lately too! I liked how this brownie turned out... rich with cocoa, moist from olive oil and coconut milk and not too sweet. It takes a while to set so I would even recommend refrigerating it to harden it up before serving. I sprinkled a teensy bit of icing sugar (also known as confectioner's sugar) on top as well, and for contrast, decorated with fresh raspberries!


DARK CHOCOLATE SPELT BROWNIES WITH OLIVE OIL & WALNUTS


(yields 12 brownies, baked in a 9 inch square pan)

Ingredients:

1 cup of spelt flour
1 cup of Dutch process 22-24% cocoa powder
3/4 teaspoons baking powder
1 1/2 teaspoons baking soda
1 teaspoon salt
2 cups of brown rice syrup (or 1 1/4 cups granulated sugar)
1 can (400 ml) of coconut milk
1/2 cup extra virgin olive oil

Optional: 1/2 cup of walnuts

Make them!

1. Preheat oven to 350 degrees. Lightly oil a 9 inch square baking pan.
2. In a large bowl, sift the dry ingredients until combined.
3. Add the wet ingredients, slowly mixing to gently combine.
4. Optional: fold in the walnuts!
5. Pour batter into baking pan.
6. Bake for 45-50 minutes in the middle rack of your oven, turning pan halfway through for even baking.
7. Let cool completely on wire rack, then chill to harden in refrigerator for 1 hour before slicing.

Dust with icing sugar if you so wish - this is done by holding a little wire sieve on top of the brownies, sprinkling icing sugar into the sieve and shaking it around, creating a light dust of powdery sugar. Fresh berries add a bright blast of colour too!

Enjoy!
Related Posts Plugin for WordPress, Blogger...